
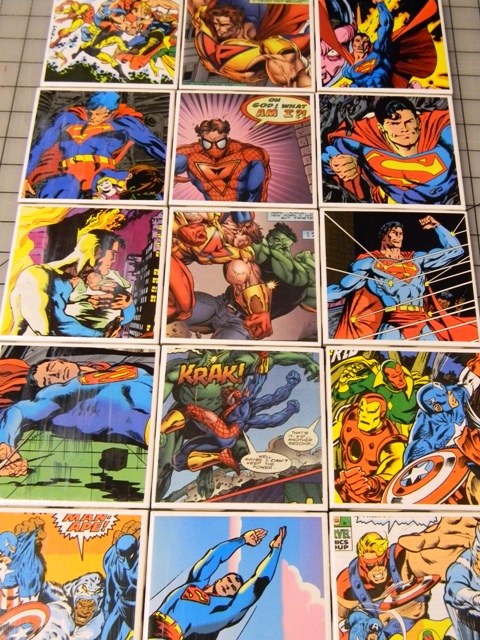
A here with another awesome coaster project! Similar to the stone coasters posted in November, these tile coasters are a great canvas for your imagination. I used comic book pages for mine, but since the designs can be made out of anything paper, it's easy to come up with ideas to fit everyone on your list. To make a set of four you will need:
- Four 4.25"x4.25" white ceramic tiles (found at most hardware stores)
- Comic book pages you don't mind destroying
- Mod Podge
- Quick drying adhesive (I use Scotch archival glue)
- Clear coat spray (we used Valspar, Krylon works well too)
- A paint brush you don't mind destroying
- 16 sticky-backed felt "feet"
To get started, flip through the comic book looking for splash pages. You want to find images that would be framed nicely in a 4" square. If you don't want to cut up your prized collection, keep an eye out for annuals and cover collections. They have a much wider array of large images. Once you've found the ones you like, trim them to be 4" x 4". This will leave a little white border around the edge of the image as if it were a comic book frame.

Take one of your tiles and put a small amount of quick drying glue on it. Spread the glue around with the paintbrush, making sure there is an evenly coated surface and that the glue extends all the way to the edges of the tile. Then grab one of your comic book squares and center it on the tile. Be careful not to press it down too hard at first. You want to start from the center and rub it down firmly with your fingers. Push all air bubbles to the outside edges so they don't get trapped under the paper. Be careful not to scratch the paper with your nails, as it will be somewhat soft because of the glue. Once it is firmly down, run your finger around the outside edge of the paper making sure all the edges are sealed. Then set it aside to dry while you do the same to the next three tiles.
Once you've finished gluing all four pieces down, go back to the first one you glued. It should be dry enough to start the next step: Mod Podge. Take your paint brush and dip it into the Mod Podge, then brush it on to the coaster, making sure to evenly coat the surface. Don't skip the edges and make sure to only brush in one direction. The strokes can be horizontal or vertical, but should be kept consistent.

Once again, set this coaster aside while you put a coat on all the others. You should be able to go back and add a second coat once the coasters are dry to the touch.

After two coats of Mod Podge, I leave the coasters to dry overnight. The next day they can be sprayed with a coat of Clear Coat to seal them. This step is necessary to make them water resistant. If you get the glossy clear coat, it will also make them shiny!
Side note: There is apparently a waterproof Mod Podge that they label "Outdoor." We've never tried it, but theoretically you could use it and forego the Clear Coat step. Once again, attempt this at your own risk, as I have no idea if it works.
The final step is to stick felt feet to the underside corners of the coasters. Because they are made of tiles, they're a a bit sharp and have an abrasive texture on the bottom. The feet will protect your furniture.
As I said earlier, any 4x4 piece of paper could be used for this project, so I encourage you to experiment with scrapbook papers, newspapers, photos, greeting cards, etc. It's a great way to preserve keepsake papers that have no where to be displayed. Show me your handiwork below, and if you like the coasters you've seen in this post, keep an eye out for the grand opening of our With Our Powers Combined Etsy shop! You just might be able to buy a set for yourself!
I LOVE THIS IDEA!!
ReplyDeleteDoes it require the new magazine style pages, or will the older newsprint style pages works?
ReplyDeleteWe've used a variety of papers: modern glossy pages, heavy weight cover stock, and oldschool newsprint pages. Newsprint is softer and a little harder to get stuck down evenly without bubbling. Also, the richness of color compared to a glossier stock is lacking, but the colors get a boost under Mod Podge and a gloss coat at the end.
ReplyDeleteYou'd be able to tell there's a difference, but they still look good.
Lesson learned No 1) Even though the hardware store has it listed as 4x4, the tile is 4.25x4.25, so no need to cut you image to 3.75x3.75 before you find this out. Oh well, my first one has a larger white border.
ReplyDeleteJaime, I assume you use some kind of grid for cutting? This doing it with scissors is for the birds...
I could not agree more about scissors. We use two things for straight cuts: A Fiskars cutting board that uses a rotary blade to make even, repeatable cuts or an Xacto blade on a gridded mat with a steel ruler. You may also want to make yourself a 4"x4" cardboard (or graph paper) template, place it over your image, and trace around it to give yourself something to work from. Let us know how they turn out!
ReplyDelete