
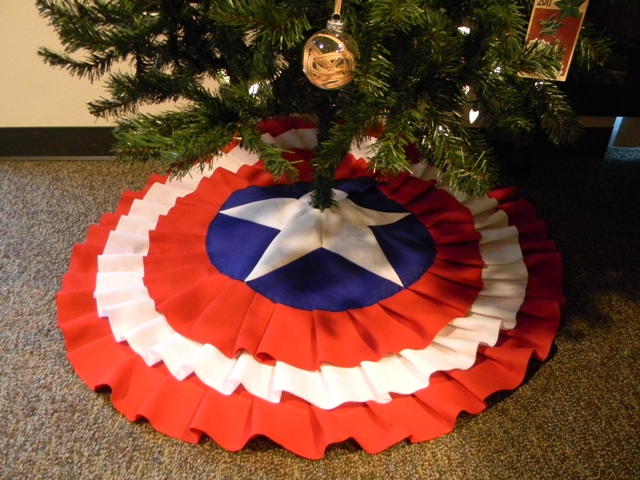
This post is a real first in 'With Our Powers Combined.' This one is legitimately a group project, whereas previous posts have been kind of one-sided, even if they represent a joint interest. So, here's where we walk you through making your very own Captain America tree skirt. One of the fun parts of this thing is it looks like a regular tree skirt when there's presents under there, and then BAM! Maximum nerd stealth as you open the gifts on your holiday of choice.
You'll Need:
- 1 yard red felt (72")
- 1/2 yard white felt (72")
- 1/4 yard blue felt (72")
- 1 dollar store tree skirt (ours was 42" across)
- all of the pins
- star & circle pattern pieces (provided below)
Browsing Pinterest, A noticed a country home tree skirt with alternating stripes of red and natural burlap in ruffled concentric circles and it became, in her mind, the template for the shield of Captain America. After a brief conversation, we snatched up some felt on sale and got started.
First things first, the measurements: Throughout, I'll be talking in reference to a final skirt that is 42" across. If you have a larger or smaller tree, you'll need to scale your measurements and pattern pieces to match, or you can add more rings around the outside of the shield (which is not, strictly speaking, accurate to the Captain's shield). So, Cap's shield is approximately half blue (21") and the outer half is evenly red and white (3.5" each for three stripes, 2 red, 1 white). The actual measurements vary by a couple percent on each stripe, gradually getting narrower toward the edge, but that may also be an artifact of changing artists. So, we'll go with the measurements given.
And no, Golden Age enthusiasts, we're not attempting the medieval-looking original shield. You can do that on your own time.
So, knowing we needed a 21" blue field with a five-pointed star, I hit up my drafting program and created some template pieces. We cut these out and made cardboard masters so we could cut out 5 copies of each.

Cut 5 of Part A, the tapered diamond, to make the five points of the white star. There is a small horizontal line across each end of the pattern. Those represent the actual ends of the pieces, but A assured me that additional fabric would be necessary from a quilting perspective. So, don't snip the ends off just yet. Instead, mark the interior point on from the pattern onto your fabric so that you can appropriately line up the white and blue seams later.

Layout dots have been highlighted. We suggest a yellow Sharpie in real life.
Part B, the arc, is the blue field behind the star. Again, you'll want to cut out five. After you have five of each, start piecing them together. Match up the short sides of the star parts and stitch those all together with a 1/2" seam and trim the seam allowance.

Then, carefully line up the blue field parts flush with those interior corners of the star and stitch down the long edge of the stars. The points of the white felt will extend beyond the edge of the circle! Do not panic yet. If you've lined them up correctly, the blue felt should meet up with the layout dot you made toward each point of the star.
If you've been careful and your quilt-fu is strong, you will shortly have a white star in a blue circle. Trim the seam allowances as close as you like. If you are anything like us, this step will cost you some time with happy dancing and praising one another. This is the step at which the excess felt of the star points come off to even out the circle.

To the rings! Lay out your dollar store tree skirt (or large scrap fabric circle. We don't judge) and cut yourself some strips of felt for the stripes. We cut 3 red strips @ 4.5" x 72" for the outer red circle on ours, assuming an overlap of 1" on each tier to cover stitching. (You'll need more strips if you aren't using 72" felt.) Start laying out your felt and pin your ruffles down, keeping careful to stay even as you go. If you have a comically oversized compass to draw concentric circles, now is a good time to use it. Failing that, you can tie a string around a Sharpie and draw circles that way. Or, you could be like A and use your craft-trained laser eyes to eyeball concentric circles and make it all come out anyway. That's a kind of cool I'm definitely not (and you may share my deficiencies), so I provide some alternatives.

Once you've pinned that mess, tucking the leading edge of each new strip of felt under to emulate a ruffle for seamless edges, sew it on your trusty sewing machine. (Note, you may have excess red felt from your third strip once you've finished your ruffles. Just slice it evenly with the access slice on the tree skirt.) We briefly considered the hot glue method of the original inspiration, but Cat is much too helpful to permit that to survive for more than a weekend, much less the month+ it needs to last.
Cut out three strips of white felt at 4.5" x 72" and repeat the circling. We tried to space our ruffles in between the red ones, but it does make for a super fluffy skirt. Adjust to suit.
For the final ring of ruffles, we decided to extend quite a bit under the shield and make the final strip a little over-long to compensate for any weirdness that may have occurred in previous strips. To that end, we cut 2 strips of red felt at 7" x 72" and ruffled them like the previous few.
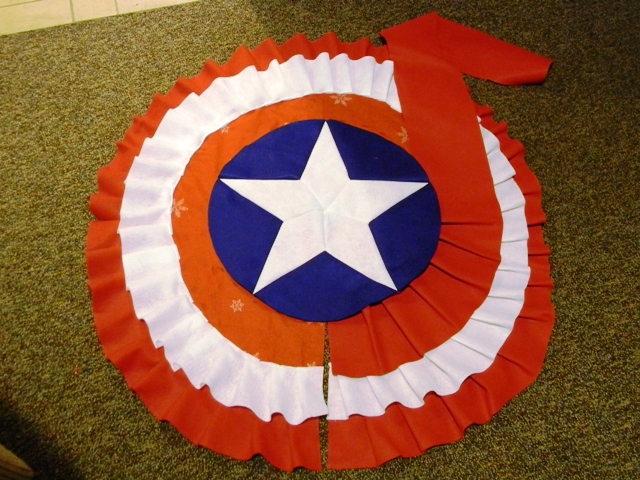
Yours won't have the badge yet. We wanted to peek ahead.
Once that was securely stitched down, it was time to place the center badge. Fold it in half and line it up on your skirt's existing seam to center it, then pin it down.

Once pinned, cut the seam to the center and snip out a circle in the center to fit your tree trunk. Hand-stitch the center badge with blue thread around the outer edge of the circle, avoiding the points of the star. Once you've done that, you can call it a day. We decided to trim out the remainder of the underlying tree skirt to keep puckering and weirdness to a minimum. Simply trim back to the machine-stitched edge of the innermost red ring. We did our bobbin thread in black to make it easier for you guys to follow the pictures, and certainly not because we ran out of white thread and made the executive decision to finish with the closest bobbin on hand. Anyhow...

Once trimmed and all threads clipped, settle your new Captain America tree skirt under your Christmas tree and marvel at what you've accomplished. If you have any questions, feel free to send us an email or ask it below and we'd be glad to help you finish yours!


Hello,
ReplyDeleteI write for a site called Geek Crafts and I just posted your awesome
Captain America tree skirt tutorial. You can see the post here - http://geekcrafts.com/14633-have-a-merry-geeky-christmas/. We'd love it if you could link back to us from your blog or profile. Be sure to send us any other geeky crafts you make so we can post those too. Thanks so much!
Yours,
Grace
Any chance the template will be housed on another server? Noticed that the link was broken.
ReplyDelete